

Bounty of Boxes – 10x13 boxes with screen bottoms
Last spring, I decided that I needed some shallow containers for deciduous trees that I was growing and the easiest way to get those was to make wooden boxes. These would provide me with several different sizes of containers to transition out of deeper terra cotta pots while continuing to facilitate the best development possible (not necessarily the fastest). The results were fabulous and I want to share with you how I went about it. My attempt here is to give you an idea of my techniques, materials, tools and my thought process that went into these so that you can formulate and build your own. First of all, the purpose of these boxes was to grow trees larger while developing a flat, finely divided root system. Wooden boxes work great for this as they are inexpensive, easy to customize, and allow the roots to breathe very well. I built approximately ten in one Saturday morning, with all of the variations that you see.
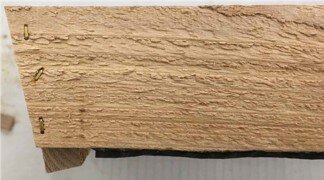
Angled Sides (Side View) – Sides of box showing the canted side and end piece extending down to act as a foot. Stapled screen is also visible.
The first chore was to rip some long strips of 6-foot cedar fence boards on the table saw for the sides and ends. My big tip here is to buy your boards at least a week ahead of the work. Bring them into the garage and stand them up, spacing them apart so that they can dry out. I am not sure if they are wet from weather, or their own sap, but the wet wood really slows you down, make very rough cuts, and dulls your saw blade. A little drying goes a long way to making this an easy process. I cut the sides 2” wide and the end 2.5”. The next step was cutting these boards down to pot lengths. I started small, with my final outside dimensions coming in at 10x13 inches. That gave me an inside size of about 8.5x11.5, roughly a sheet of paper. This was the main size that I was after, so I made about 6 of them. The ends were very easy, as I just straight cut them on the saw (table saw or chop saw will do) The sides were a little different story. I had seen many photos of wooden boxes from Japan and noted that they had a canted side, which I really like. I made mine about 10 degrees. That’s about all that you need for a nice presentation. This is where the old saying of measure twice, cut once comes in handy. Those angles can really fool you, but these don’t have to be too precise.

Finished box (Top View) – without the lat-er added strut. Note the screen stapled to the inside on the ends.
Once you have your sides and ends cut, all that remains is assembly. There is no doubt in my mind that the one tool that really made this whole project possible is a pneumatic stapler. I used narrow crown staples, meaning that they are only about a 1/8” wide. You are go-ing to need a length of at least 1”, but use more than 1.5” and you may poke out side-ways. Although safety with saws comes with-out saying, staplers can be a bit tricky and shanks can shoot out the sides if not angled properly, or they hit another staple, so make sure your hands are well clear of anywhere a staple can reach. Then it’s a snap. Bing, bing, bing, one side, bing, bing, bing, the other. These only need to hold for about two years, but should last about five.

Corner Construction (Bottom Corner) – The side and end are joined, with screen stapled to the bottom of the sides.
All of the above may seem fairly straight forward, but here is where the fun begins. I started experimenting with different bottoms. I had some really large drainage screen that I never use, so I thought it would be nice to use it up here. In the photos you can see how I notched out the corners of the screen so that I could staple it to the bottom of the sides, but tuck it up into the ends. This helped maintain the all-important air space below the box.
Easy peasy, that is, until I went to pot something. Turns out that although I had lots of air space, the bot-tom was very floppy and there was no place to anchor any wire to tie down the tree. Disaster. So, I improvised and cut a narrow strut to go across the center under the mesh, making sure the pot didn’t rock on it. Phew! But I still had to carefully thread tie-down wire through the mesh and across the strut for a minimum of support. Luckily, all the trees that I was planting had well established root systems. Crisis averted. Before I discovered this little problem, I had made some larger models, using regular size mesh. But for these I used evenly spaced wooden struts across the bottom. A big improvement but it used a lot of mesh that was not needed.
My last versions used a full wooden bottom. I cut the boards to length AFTER I have as-sembled the main box, so that I could get the dimensions correct. If you take a look at the pho-tos, you will see that I used two different scenarios for mounting the bottoms. The easiest to perform is flipping the box over and stapling the boards to the bottom of the side rails, overlap-ping them to the outside edge. The problem here is that my end pieces that double as feet did not take this into account, so bottom sits maybe just 1/16 of an inch off of the bench. Not ideal. On the next model, I cut the boards to fit the inside of the box, then had to elevate or hold them as I stapled them into place.
At these small sizes, strength is not really a factor, but this construction would hold the bottom in longer, and stronger, whereas the first method makes a more rigid box overall. But again, not really the issue here.
As I worked my way up in sizes, I noticed that I was getting really close to the size of an Andersen flat. My problem with Anderson flats is that unmodified, they will rot out your benches fairly fast, and they are not stable enough to keep the roots from moving. It’s not their fault as this isn’t what they were designed for. So, taking a cue from the previous work, I cut four strips and stapled them to the bottom from the inside, curing both caveats. Stability and aeration are now mine.

Three Styles (3 Boxes) – One box with a screen and strut bottom. One with the bottom boards stapled be-low the sides, and one with the bot-tom stapled into the side, raising it higher.

Anderson Flat (Anderson flat) – Anderson Japanese Flat with four cleats stapled to the bottom.

One year later (Maple in box) – This maple is happily growing in its new home.
Most of you will not have the power tools that I used to create these boxes. However, if you are interested in making some of these, I suggest that you work out the sizes and number that you need, and then approach a bonsai buddy or two and share resources. You can spend a Saturday morning making boxes and swapping bonsai war stories and everyone comes out ahead. Four hands and two heads really do make things go together easier.
Scott Elser