
Since we have so many folks that are new to bonsai, I thought I would talk about the tools that are essential for your success. I also thought you might print the article out to read and then casually leave it in a conspicuous place for your spouse to discover, who might need some holiday gift giving suggestions ;-) These six tools that I am covering are the ones that I use over and over, almost every time I touch a tree, whether it be conifer or deciduous, large or small. I’ll cover what to look for and in some instances, what might make a good substitute.
I would rarely buy a bonsai tool online. Only when I am familiar with the quality and consistency of a brand would I do that. There are many great tool makers out there, like Joshua Roth, Futaba, Kaneshin, Fujiyama, and a new upstart, American Bonsai, which are all American made. American’s tools are very consistent and I would check them out. I am trying them myself. Because the markings are often in Japanese, I have a hard time tracking which brand of tool I actually have.
One of my own limitations to some tools are my relatively large hands, so I always have to check and make sure that they actually fits in my big mitts. That pertains mostly to scissors. Then I open and close the tool to see if it is too loose or tight. A tool should barely fall open when you hold it horizontally. If it’s too loose, you can give the rivet a tap. But a word of caution, there is no way I know of to loosen a tight tool except by using it over and over. My next test is to hold cutting tools up to the light to see how the edges meet and if there is a gap letting light through. Root cutters, concave pruners, and knob cutters all work in a bypass cutting fashion. That means that the edges slightly overlap each other. They do not meet perfectly. So they have to close far enough for the cutting edges to pass, but not have a gap when they do. Stainless steel as a material is often nice, but not needed. Most of my tools are not. Now on to the tools themselves.
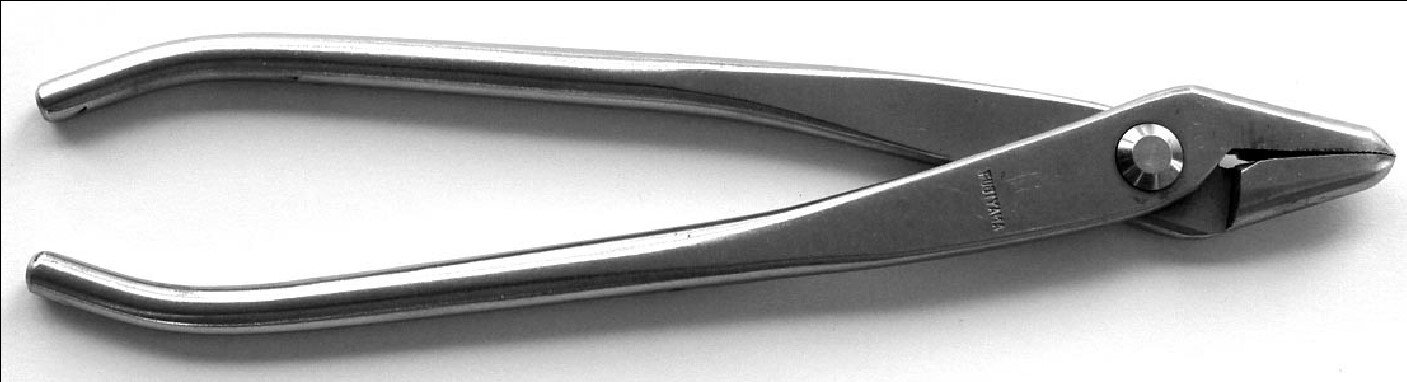
Number 6 – Angled tweezers This is easily going to be the cheapest tool to acquire of the lot, but it does come in quite a few grades. A good pair of tweezers is a godsend and a bad one is just frustrating. We are talking here about the type with a bent or angled tip. These often come with a small spatula on the end and the cheaper models are just spot-welded together. But really, you don’t need much more than that. Oh, I do have a really nice pair that I love, but my original pair is still a workhorse. If you use them in repotting like I do, in place of chopsticks, you can wear them down over time.
Their chief duty is pulling weeds and general clean up. Make sure to get a pair with not too narrow of a point. Otherwise, they just act like scissors and cut the weed in half rather than pulling it. This is especially important if you also get a straight pair. Here’s the difference; Angled tweezers are great for pulling weeds, repotting, and general work. The straight tweezers are better for pulling needles and leaves. The elbow of an angled pair will accidentally grab onto adjacent foliage, which can be quite hazardous.
Reprinted from December 2016. Ideas for bonsai Christmas presents.
There are lots of occupations and hobbies that use tweezers, so you might be able to find something that you already have, but they really do need to be eight or so inches long for reaching under the tree. Ideally, they only open about 1/4-3/8 inch, otherwise you have to keep applying the pressure to get in between other leaves and such, which just tires your fingers. Also, the metal needs to be stout enough to apply some good pressure when pulling needles. With cheaper tweezers, I sometimes squeeze hard enough to touch the sides together. If so, I just bend them out farther.

Angled Tweezers
Number 5 - Root Cutters Though I have a smaller pair of root cutters, I use my large pair almost exclusively for root work and any large pruning short of using a saw. They really are very versatile. Use them to cut taproots flush, as well as any other large roots. This tool is essential for creating a great root base and enables you to get your trees into shallow bonsai pots. Even though I regularly cut through pumice, lava, and the like, I have never had to sharpen mine. That’s not bragging, it just means that they are very durable and can take the punishment, but mine probably could use a touch up.

Root Cutters
Number 4 - Wire pliers I use wire on every single one of my trees, so this tool can become very important. You can use just about any small pair around the house, but in my book, nothing really compares to a bonsai designed pliers. The type that I have pictured work excellently at a fair price. The rounded tip allows you to apply power with pinpoint accuracy and without getting a part of the branch stuck in there. The tapered/rounded handle allows you to twirl the tool in your hand easily when tightening a guy wire or removing wire. Almost all of the inexpensive models have straight handles and are hard to use. Their tips also are not very strong and they become hard to use. At workshops, I have picked up pliers from students that were nearly worthless. Be picky here with the real deal, or just get a sturdy pair of Stanley’s and save your money.
Wire Pliers
Number 3 - Wire cutters There are quite a few different designs for wire cutters. Pictured are my favorites for small work, but every other pair I have tried works. There really is no other tool for the job out there. Bonsai cutters are made to cut right up next to the branch without damaging it. Plus, they concentrate the power out on the tip for that same reason, instead of needing to cut in the crotch of the tool, like many electrical dikes.

Wire Cutter medium
Number 2 – Concave Pruners You really have two choices here; regular concave pruners or spherical cutters. The difference being that regular concaves are curved on a single axis and spherical cutters are curved on two axes making a truly round cut. The difference between a concave pruner and the root cutter or knob cutter is that you can cut from the side of the branch. This is your workhorse pruner. Invest wisely and note the suggestions at the beginning of this article on how to choose one that works well. The is one thing that you need to keep in mind for any pruners. You are only going to be able to cut a branch about half the diameter of the actual blade. This also depends greatly on whether you are working with conifers or deciduous trees. I can cut twice the diameter of a pine as I can a crabapple or maple.

Concave Pruner

Concave pruner side view

Spherical pruner side view
Number 1 – Scissors Did you guess this one already? This is not the pair that you have in your junk drawer in the kitchen. This is the tool that will make thousands of cuts each season and vital for your bonsai success. Choose wisely. There are lots of variations in shapes, but make sure you get one that fits your hand, and can make hardy cuts. The smaller and narrower versions are for bud cutting only and should be considered as a alternate pair in your kit, not the primary one. Great scissors abound at decent prices, so finding one should not be too hard. With your main pair you want to be able to do light pruning, maybe up to a quarter inch branch at times. You also need a narrow point to get in between tight spaces. That’s why you need dedicated bonsai scissors.

Scissors
What you don’t need Now that we have gone through all of those essentials, how about the things that you don’t need? There are lots of tools out there, but some of them are not very practical, or rarely used, so I am here to help you keep a little more money in your wallet for better trees, or better tools. So, here are the tools that you don’t need.
1. Bending clamps. I bought several of these and even used some once or twice. It took my maple ten years to recover from the experience. There are better ways to bend a branch. I have never seen a pro use one.
2. Branch splitters. These are similar to root cutters, but with narrower and longer blades. I bought one twenty years ago and never used it. If I did need one, I can make the root cutters do the work. Come to think of it, in all that time, I have only heard of someone actually splitting a branch once or twice.
3. Bending jacks. These can be of use in larger sizes, and many pros use them this way. Most often they make it so that you can get the work done with one person. But the smaller ones are really unneeded.

Branch Splitter

Bending Clamp
4. Jin pliers. These are similar to the regular straight pliers mentioned above but these have a canted head. That means I can’t use them to twist wire, but I can use my wiring pliers to make jins. That means these are redundant.

Jin Pliers
And last but not least, if you do large bonsai or are getting more advanced, here is what you might need to add to your assortment.
1. Compound wire cutters. You can buy larger, more expensive bonsai wire cutters, but why when these guys are a fraction of the price. It will cut 4 gauge hardened copper wire and won’t be damaged by steel wire. Buy the Knipex brand. I bought a cheaper $20 version and they hurt my hand and were trashed by steel wire.

Compound Wire Cutter

Knob Cutter
2. Knob cutter. I almost put this as my seventh choice for a tool. I use it mostly on deciduous trees, and it really gets a workout to clean up all my cuts so that things heal over nice and smoothly. Look for a pair where the two cutting edges meet to form a nice, smooth curve. I have not used them, but too many I see these days meet at an angle and I can’t see how they will make the kind of smooth cut I need.
3. Saw. Many, many types here. A narrower body allows you to get between branches, but can buckle easily. So some have a thicker blade and teeth. This one is my first choice. I have a large folding landscape saw that I use on larger cuts, and several models in between.
Scott


